Polaroid image transfers are Polaroid images transfered to paper by interrupting the Polaroid exposure process and squeezing the negative side down on a piece of paper. To do polaroid transfers you need a polaroid camera which uses pack film. You can find a lot of very cheap old Polaroid land cameras on ebay which will work perfectly, but beware that some of them use outdated types of batteries which can be really hard to find. I chose to get a $25 Holga with a Polaroid back. The Holga is a cheaply produced chunk of chinese plastic which is normally used to take medium format pictures on 120 film. It has a crappy lens with insane vignetting problems and is notoriously full of light leaks. This combination gives its pictures a very unique lo-fi look. Each Holga is unique and will produces pictures with its very own one of a kind look. For just five times the price of the camera itself, you can buy a Polaroid back for it. This is an equally cheaply made chunk of plastic which allows you to take pictures on Polaroid pack film. Be aware, that due to the original square format of its medium format pictures the Holga wont expose the whole Polaroid picture, but will leave a vertical black bar on one side of the image.

The Holgaroid / Holga 120CFN with Polaroid back
To do image transfers with Polaroid film, you need to use type 669 or 690 color pack film. These are both pretty low iso films, 80 and 125 iso, so bright sunlight is a must to create really good results with the light hungry Holga. The image transfer process is actually pretty simple, but can be hard to perform successfully. The first step is to take your picture and pull out the film. Next, wait a little while (I find 10-15 seconds to work well), then split the film apart and slap the negative side down on a piece of watercolor paper. Now press it down hard and attempt to squeeze out all air bubbles. I use a little rubber roller along with a 25c coin to do this.

Sqeezing down a Polaroid
After you have squeezed it down good let it rest there for a minute or so, then carefully peel the Polaroid away. Be careful around dark areas since these have a harder time sticking to the paper and will leave you with big light blue holes in the image if you pull to hard. Since the Holgaroid leaves a black bar in one end of the picture, I find it easier to begin from the other end.
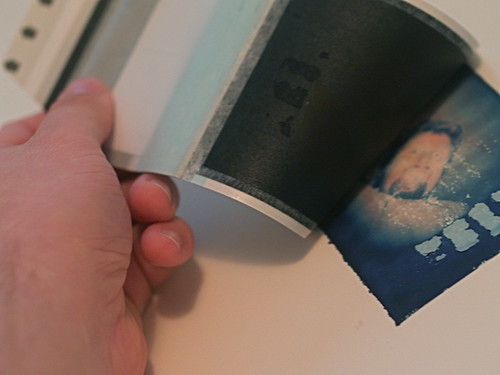
Pulling the negative of
With a little luck you will end up with the Polaroid image left on the paper. It takes some practice to produce consistently good results and even then, sometimes it just doesn't work right. In the little sample I made for these photos, I made several errors which can easily be seen in the resulting image. The first is that I didn't pull the Polaroid out of the camera in one smooth movement. This has resulted in an uneven development which shows up as lighter vertical stripes in the picture. The second error is that I let the image expose for too long before splitting it. This has resulted in too much color being transfered to the Polaroid photo paper instead of my watercolor paper (under normal circumstances the Polaroid paper would be left with a light brownish image) and finally, I didn't squeeze the airbubles out well enough, resulting in the big holes in the right side.

The end result
Perfectly done Polaroid transfers can look very soft and beautiful, but even the ones you mess up often have a certain unique charm to them. I'm currently experimenting with adding watercolor and ink drawings to my Holgaroid transfers. The following picture is a Polaroid that I both messed up by underexposing and not squeezing it down well enough. After I got home, I started adding watercolor to it and ended up with a result I really liked.
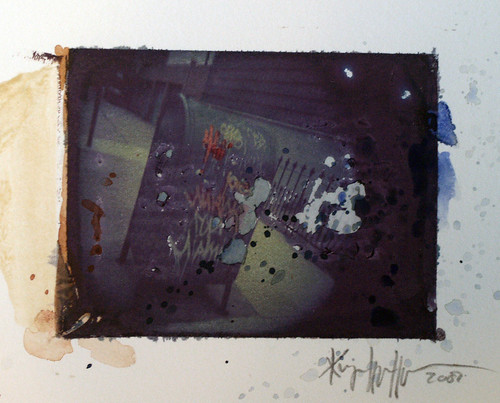
Holgaroid transfer with watercolor


No comments:
Post a Comment